


ASUS Rampage Extreme Motherboard

Motherboard Layout
Â
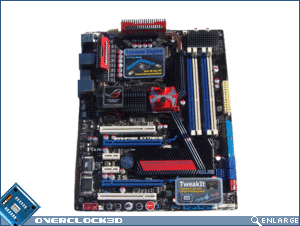
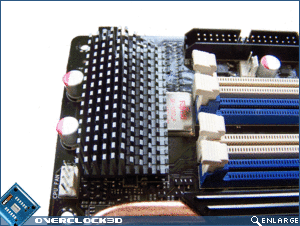
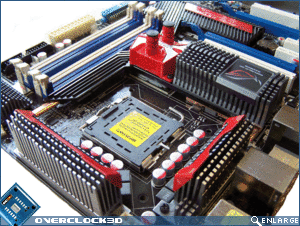
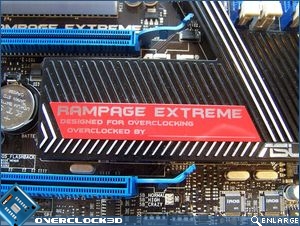
The ASUS Rampage Extreme when based on first impresssions is an awesome looking motherboard. The black PCB with the black, red and grey theme of the included heatsinks really adds to its overall appeal. The motherboard feels significanly heavier than my ASUS Blitz Formula SE which is more than likely due to the combination of Copper and Aluminium heatsinks that snake their way around the South Bridge, North Bridge and MOSFET’s surrounding the CPU socket area. ASUS have also included a heatsink directly above the Dimm’s area which helps cool the ML (Multi Layer) capacitors underneath.
Â
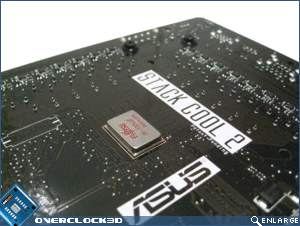
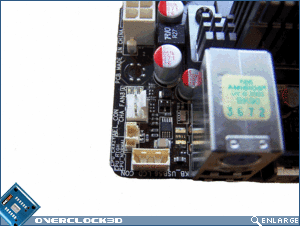
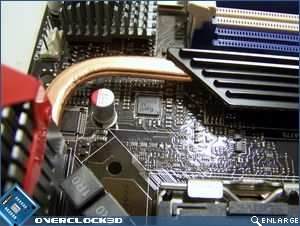
As the ASUS Rampage Extreme is primarilly deigned for overclockers, ASUS has incorporated multi-phase power management (or Extreme Engine in ASUS talk) into the motherboard. There are 3 ML capacitors in total – one on the reverse side of the CPU socket (seen below right); one near the North Bridge and one near the Dimm’s which I alluded to before. The ML-capacitors are designed to enhance lower ESR and temperature which should provide smoother system voltage when overclocking.To compliment the excellent thermal dissipation properties of the motherboard, ASUS has incorporated its Stack Cool 2 circuitry into the PCB itself. Stack Cool 2 is essentially an extra layer that covers the entire motherboard in order to help alleviate heat build up.
Â
The ASUS Rampage Extreme retains the now familiar blue and white theme for the vDimm, PCI and PCI-E slots, and solid polymer capacitors expected on such an high-end motherboard..
Â
Â
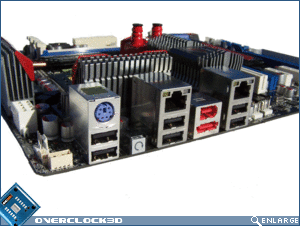
The ASUS Rampage Extreme I/O area has been issued with a total of six USB 2.0 ports, one eSATA ports, two Gigabit Ethernet ports, one IEEE 1394 and a legacy PS/2 keyboard port . Also located above the top-most Gigabit Ethernet port is a switch for clearing CMOS should you run into trouble while overclocking.
Â
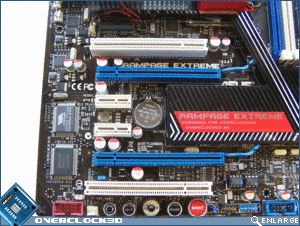
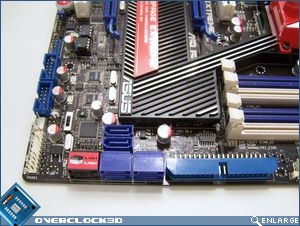
The Rampage Exteme features two PCI slots, two PCI-E x16 slots and three PCI-E x1 slots. In most scenario’s you will have access to at least two PCI slots and two PCI-E x1 slots for expansion cards. However if running an Crossfire setup this will be reduced significantly. The top PCI-E x1 slot (immediately below the elongated North Bridge cooler) is used if you choose to implement the supplied daughterboard SupremeFX X-Fi sound card.
Â
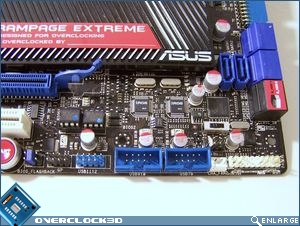
Right at the bottom of the motherboard we see the inclusion of a IEEE 1394 port (handled by the VIA 6308P); a toggle, confirm, select, reset and power switch; BIOS Flashback jumper pins and another two USB 2.0 headers. Because the ASUS Rampage Extreme features a dual-BIOS, the jumper pins allow you to switch between a corrupted BIOS and over to the remaining working one. The Dual-BIOS chips can be seen at the end of the bottom PCI slot. The toggle, confirm and select buttons are to be used in conjunction with the LCD Poster and enable you to adjust component voltages on the fly. This is a very handy feature for those who bench regularly out of the case and eliminates a trip to the BIOS to adjust voltages.
Â
The Winbond W83667HG-A is a recently released Super I/O controller, which not only provides support for legacy devices (PS/2 port, serial port, floppy drive), but also SMART FAN monitoring capabilities. It can be found in the lower left hand corner of the motherboard.
Â
Â
Moving on to the bottom right hand side of the motherboard we can see that there are yet more USB 2.0 headers, allowing for 6 USB 2.0 ports in total. In the bottom right hand corner we see the system panel connector. Looking at the lower left image we can see the inclusion of two ASUS’ iROG IC’s which are part of ASUS’ motherboard management system.
Â
ASUS has icluded eight SATA ports. Six of the SATA ports are on the leading edge and the remaining two situated immediaely behind them. The bottom two SATA ports offer ASUS’ Speeding HDD functionality and the onboard RAID is controlled courtesy of the Silicon Image sil5723CNU controller. The Silicon Image controller can be seen immediately behind the Speeding HDD SATA ports. Due to the increased usage of SATA HDD’s and DVD Drives being used now-a-days, ASUS has only included one Primary IDE connector on the edge of the motherboard.
Â
Â
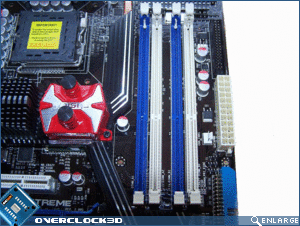
The ASUS Rampage Extreme is able to accommodate up to 8GB’s of memory in both single channel and dual-channel configurations.
Â
Continuing up the right hand side of the motherboard we can see the ATXPWR connector and above that an inclusion of the somewhat obsolete floppy connector.
Â
Â
The CPU socket area despite being entirely surrounded by heatsink’s is surprisingly spaceous and uncluttered. There’s more than enough room in here to accommodate the largest of CPU coolers; waterblock’s/DICE slug/evap head. I tested the socket area with the largest CPU cooler at my disposal – the Scythe Orochi, and there were no clearance issues to highlight.
Â
Continuing around to the top left hand corner of the motherboard, we can see the EATX12V, LCD Poster and EL I/O connectors.
Â
Â
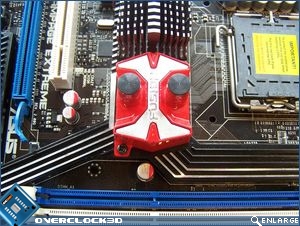
The ASUS Rampage Extreme is one of the new breed of motherboards to be fitted with ASUS’ EPU 6 Energy. This chip basically provides total system power savings by detecting current PC loadings and intelligently moderating power in real-time. EPU 6 Energy however, will not work while the board is in an overclocked state. The EPU chip can be seen in the image below (left) just below the curve in the Copper heatsink.
Â
Another feature of the ASUS Rampage Extreme that impressed me was the inclusion of spring-loaded screws which attach the heatsinks to the motherboard. The spring-loaded screws provide a significantly better surface contact for the heatsink to chip, and it makes for easier removal should you wish to use a 3rd party alternative.
Â
Â
Interestingly, ASUS felt the need to include a space on the South Bridge heatsink where you can include your name. Their idea behind this is beyond me, but hey I guess you can at least personalise the motherboard a little.
Â
The Fusion block as I mentioned earlier can be changed over to a passive air cooler if you don’t wish to utilise its water-cooling functionality. I found that the North Bridge remained acceptably cool with the Fusion block still atached, and subsequently, left the included passive heatsink in its box. The removal of two screws is all that is needed to change the coolers over should the need arise.
Â
Â
We’ve now seen the ASUS Rampage Extreme from the hardware side of things; let’s head over the page to see how well the BIOS can support the overclocking nature of this board…