


The PCO Group Intel I7 Gaming PC

Test Setup
Â
Here I ran into a little issue with this review. Normally we here at OC3D would pick the closest product in terms of power, cost, market level etc to the items under the spotlight and pit them head to head. Unfortunately there hasn’t been anything like this at OC3D before. The previous full system reviews don’t compare on a hardware level, not to mention price. So for these tests, the results will stand alone. A quick re-cap of the parts in this monster:
Â
CPU
Intel Core I7 920 (2.6Ghz @ 3.8Ghz)
Memory
6GB OCZ DDR3-1333
HDD
640GB Western Digital
Graphics Card
Nvidia GTX295 (Gainward)
Power Surply
Coolermaster Real Power 1000w
Operating System
Vista 64bit SP1
Cooling
Thermal take CL-P0310
Price
£1500.00(ish)
Â
And it’ll be assaulted with the following benchmarks & games to assess how well the machine performs. A slightly shorter list than usual, but to to some very tight time constraints with the machine itself some of our regulars had to be forgone.
Â
Synthetic CPU & Memory
• Sisoft Sandra XII 2008c
• SuperPI Mod 1.4
• PCMark Vantage x64
• Sisoft Sandra XII 2008c
• SuperPI Mod 1.4
• PCMark Vantage x64
3D / Rendering Benchmarks
• Cinebench 10
• 3DMark06
• 3DMark Vantage
3D Games
• GRID
• The Last Remnant
• Call of Duty 4
Â
Stability
Â
The first thing to check when un-packaging any piece of hardware is that it’s going to run for days and days on end without crashing. We all know how frustrating it is when your machine locks up or BSODs when your the last man standing on your team or in the middle of a huge boss fight. This becomes more important with a pre-overclocked PC, as you don’t know what state the manufacture left the bios in before shipping.
Â
So naturally, the first thing to do was load the machine up with Prime95 to stress the CPU. Unfortunately, there had been minimal tweaking beyond setting the BCLK to 190 in the BIOS, all other settings were left to auto. This lead the P6T to decide to push 1.43v through the poor little 920, which then lead to temperatures hitting the wrong side of 100° after only a few minutes of priming and threads started failing left right a center.
Â
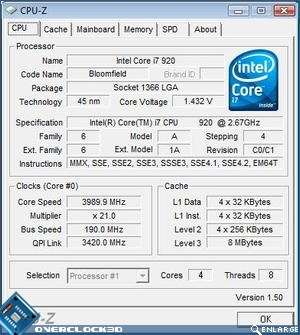
Â
A little disappointing to say the least. If you look at the CPU-Z dump above however, you will also notice that it’s clocked nearly 200Mhz over what the specifications on page one stated. So without further ado I went about tweaking the set up to see if it could maintain the overclock first suggested by the machines specs list. I’m pleased to announce, after a very short time spent tweaking, i got the system stable at just shy of 3.8Ghz (180×21, 3780Mhz) with only 1.25v needed to keep it healthy over an 8 hour priming session. This setting was then used across all the tests ran over the next few pages.Â