


ASUS Xonar DX 7.1 PCI-E Sound Card

Installation & Drivers
Installation was a breeze as should be expected but one thing I did want to try was NOT connecting the requested power supply via floppy power cable. I’m a sucker for doing exactly the opposite that hardware manufacturers recommend. Anyone who had a 680i board will know adding the ‘extra’ molex power to the board made no difference whatsoever so I wondered if this card followed suit. Not so I’m afraid as the card would not work without it – which is why Asus remind you to plug the power cable in both in the Quick start up guide and before installation in Windows so ensure you have a spare floppy power cable before buying this card. I should also note at this point that although the card is a PCIe x1 card it will work with other pci express ports should you not have access to the x1 port. This was tried and tested in a 2nd PCIe x 16 port which worked without problem. For this installation I will however be using the PCIex1 slot which resides directly below the 16x PCIex16 GPU slot. I couldn’t use PCIe x1 slot above the GPU as the Xonar DX is too long and wouldn’t fit due to the DIMM’s interfering with the soundcard placement – something you may want to investigate you as this is common on most motherboards which have a PCIe x1 slot in the uppermost position.
I decided to install and test the card on a Windows Vista based setup as Vista compatibility is something that creative drivers struggled with. Suffice to say the driver and software installation went without a hitch (after I had plugged in the power cable!). The same procedure was used with XP and again, no problems were encountered when following the installation guide. Both 32bit and 64bit Windows operating systems are supported. No major problems are being reported on the Asus support forum for windows users, which again is testament to the excellent drivers provided.
With only one set of drivers on the Asus support website (dated 13/02/2008) it appears that Asus are happy with the first release and as such no further drivers have yet been released to the public. Unfortunately no drivers for Linux were on the supplied support and drivers CD nor the Asus website which is echoed in the system requirements so Linux users should look elsewhere for a soundcard as the Xonar DX plainly does not have Linux support which is disappointing.
Xonar DX Audio center
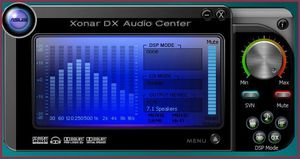
The Xonar DX Audio Center is the brains of the card where you control all the settings and configurations to your preference. In its most basic form you can change the output volume along with ‘SVN’ which is a noise balancing feature and the obligatory mute button. There are also five DSP modes which change the acoustics of the card depending on what type of media you are working with, music, Hi-Fi, Movie, Game and GX.
Main
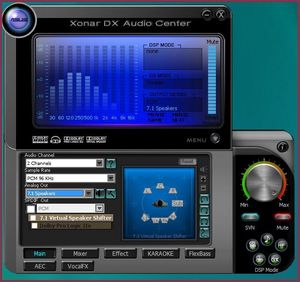
After pressing the Menu arrow, the ‘LCD’ reveals a wide range of settings. In the main screen you have the option to set the audio channels(2,4,6,8) , the sample rate(44.1Khz through to 192Khz) and your speaker configurations( Headphones 2,4,5.1,7.1 FP headphones and FP 2 Speakers). Unfortunately the speaker test would not work with Vista to the way Vista stacks the audio but worked fine in xp so you will have to test your speaker setup by other means if using vista. You would also configure your S/PDIF out configuration in this screen. The 7.1 virtual Speaker Shifter is a clever little utility that allows you to arrange the positional audio of your speakers according to their physical placement which is very useful if you cannot use the standard surround setup. Dolby Pro Logic IIx is also catered for in this section with music or movie configurations.
Mixer

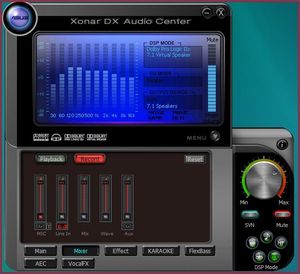
The Mixer screen allows the user to configure all the faders for each speaker in your setup depending on the speaker configuration in the Main panel as well as controlling your recording devices.
Effect

The effect window allows you to experiment with your preferred reverb effect which include the Bathroom, Hall, underwater and music pub as default with an optional 20 others selectable with the drop down menu. These effects can be further tweaked using the Graphic Equaliser ranging from -20 to +20dB with 12 of the most common presets and a user defined one allowing you to save/load your favoured settings.
Karaoke

I always find playing around with the karaoke section of soundcards utilities fun and this was no different. Options here include key shifting which adjusts the key of your audio allowing it to be matched to your singing style. Vocal cancellation is dependent on your chosen audio tracks– sometimes it works OK but others not which while disappointing at times is hardly a fault of the software as it appears to be effected by each individual track and not the mixer. The mic echo further enhances the quality of your singing skills. While I wouldn’t use this in a professional capacity it is fun, especially if you have children or for that drunken house party!
FlexBass
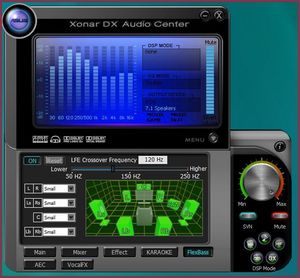
This section covers control of your bass. Depending on your preference you can set the crossover frequency from 50Hz to 250Hz as well as selecting your individual speaker sizes as well as your headphone cans be them ear bud type or full coverage which is a nice customisable feature to have.
AEC
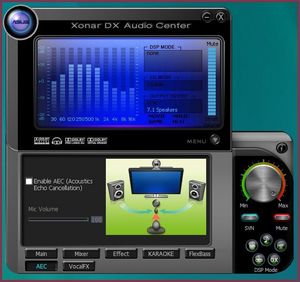
AEC (acoustic echo cancellation) allows the user to properly configure the microphone. This panel allows the user to cancel echo and adjust microphone volume to properly configure the voice communication setup. Once you enable this setting the Audio Center automatically switches to a 2 speaker, voice processing mode and also suspends any sound effects which save a lot of hassle for that quick VOIP call.
VocalFX
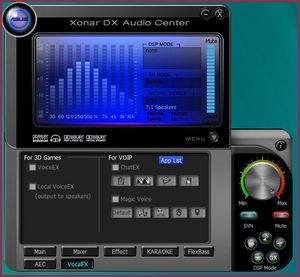
This panel is perhaps the most fun and adds that novelty factor to the whole package. You can change your voice here to sound like the sinister low pitch stalker or to a character from Looney tunes. Great fun if you want to disguise your voice from your clan mates and family alike when using VoIP. Presets include Monster, cartoon, male and female. You can also configure your ambience again with the 4 presets, Bathroom, Hall, under water and music pub.
Also included on the support CD is PMP lite – a piece of software that allows you to convert your audio files to various formats as well as having a useful utility which allows the user to add their own ambience to the file. While basic it is very easy to use and I’m sure would be utilised quite often. Especially useful is the Dolby headphone setting which converts your stereo audio to a virtual 5.1 soundstage – impressive indeed.
Overall the software package is well thought out and can be quickly picked up and adjusted by novice and pro alike. All the basic setting you would expect from a 7.1 card are there along with some useful, advanced and novelty additions you would only expect to see on more expensive cards.