To ensure that all reviews on Overclock3D are fair, consistent and unbiased, a standard set of hardware and software is used whenever possible during the comparative testing of two or more products. The configuration used in this review can be seen below:
Processor: Intel Core i5 750 (2.66Ghz)
Motherboard: Asus P7P55D Evo
Memory: 4GB Kingston Hyper-X DDR3 @ 9-9-9-24 1333Mhz
Graphics Card: NVidia GTX280
Power Supply: Gigabyte Odin 1200W
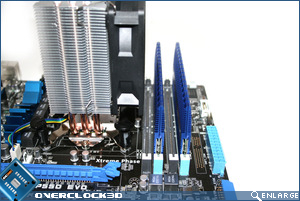
CPU Cooling: Coolermaster Hyper TX3
Hard Disk: Hitachi Deskstar 7K160 7200rpm 80GB
Graphics Drivers: Geforce 180.60 CUDA
Operating System: Microsoft Windows Vista Ultimate x64 SP1
During the testing of the setup above, special care was taken to ensure that the BIOS settings used matched whenever possible. A fresh install of Windows Vista was also used before the benchmarking began, with a full defrag of the hard drive once all the drivers and software were installed, preventing any possible performance issues due to leftover drivers from the previous motherboard installations. For the 3DMark and gaming tests a single card configuration was used.
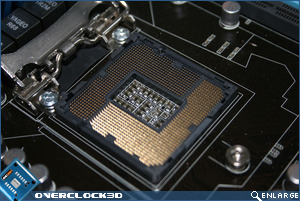
I do like this new method of CPU retention as it is no longer a fiddly process of installing the CPU. The main plate itself raises along with the locking bar resulting in the whole of the metal frame lifting away from the plastic socket area. With the CPU and heatsink installed you can see from the picture above that space will be very tight should you wish to use a rectangular heatsink in a horizontal configuration. The Coolermaster Hyper TX3 heatsink we used for this review is smaller than the extreme CPU heatsinks we would normally use and I think it is safe to assume that oversized heatsinks such as Thermalrights Ultra extreme would certainly present difficulties.
To guarantee a broad range of results to best evaluate the motherboards performance, the following benchmark utilities were used:
Synthetic CPU Test • Sisoft Sandra 2009
• PassMark CPU test
• SuperPI 1m, 8m, 32m
Memory Test
• Sisoft Sandra 2009
• Everest 4.60
File Compression & Encoding
• Sisoft Sandra 2009
• 7-Zip File Compression
• River Past ViMark
Disk I/O Performance
• HDTach 3.0.4.0
• Sisoft Sandra 2009
3D / Rendering Benchmarks
• Cinebench 10
• 3DMark 05
• 3DMark 06
• 3DMark Vantage
3D Games
• Crysis
• Far Cry 2
• Call of Duty 4
Overall System Performance
• PCMark Vantage
Power Consumption
Power consumption is an aspect often forgotten when it comes to enthusiast motherboards but in today’s climate, with rising utility bills special consideration needs to be taken when choosing you components as over a period of time, one components can prove to be much more expensive than another over its lifetime. Power consumption was measured at the socket using a plug-in mains power and energy monitor. Idle readings were taken after 5 minutes in Windows. Load readings were taken during a run of 3DMark Vantage.
Consuming just a minuscule 120W when idle is some achievement for the Asus P7P55 EVO. Figures such as this will please the tree huggers out there but they may well frown when they see that the same setup more or less equals that of the i7 and AMD setups when placed under load conditions.
Overclocking
Here’s a couple of the obligatory CPU-Z screenshots at stock:
Rumours are that Intel have restricted the overclocking on the latest generation of Core series CPU’s so I ventured into the overclocking with trepidation. You will have to bear in mind that as the BIOS, motherboard and indeed the CPU are engineering samples and as results of retail offerings may well differ. Along with the Turbo Technology option available in the BIOS, the CPU ratio could be also be set manually to 21x instead of the stock 20x. I disabled the usual garbage that can restrict overclocking in the CPU features and decided to set a limit of 1.4v on the CPU Vcore, which is the same for our i7 testbed. The memory was set to 1333MHz (the maximum allowed) which would increase in line with the base clock of the CPU. All voltage settings were left at Auto apart from Vdimm and Vcore.
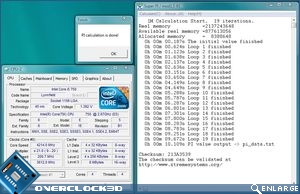
I am happy to report that in our case at least, no such restrictions were identified. Intel it seems are happy to let the overclockers out there stress there hardware to the maximum and as such I achieved a great overclock of 4.214GHz. This overclock was tested with both SuperPI and multiple loops of 3DMark06 which while not 100% proof of stability does give a fair indication nonetheless. Overclocking the i5 was as easy as overclocking the Core i7 CPU so most, if not all enthusiasts should be able to achieve similar results. CPU temperatures were around the same high levels of Corei7 but it would be unfair of me to compare like for like due to using different CPU coolers.
What I did find interesting was that Core i5 topped out at around the same level of Core i7 (C0). This ceiling may well be increased with future revisions of the Lynnfield processor as was the case with the Nehelem D0 which are known to hit in excess of 4.5GHz.
I was intrigued to find out just how far the memory controller on the i5 could be pushed so using a 4GB set of Kingston Hyper X (2000MHz – CAS9) I set about overclocking that as well. While the Evo could not quite manage the 2000MHz SPD, even by using either the EVO’s XMP profile or Kingston’s, I did manage to get 1800MHz which was stable enough for a few benchmark runs. 2000MHz just flat out refused to post, even with 1.7v (0.05v above the rated voltage) and the timings slackened and 1900MHz began to throw up errors so 1800MHz was the speed I reluctantly settled for.
Returning the motherboard back to it’s default settings but disabled Intel Speedstep and C1E thereby setting the CPU to it’s rated speed of 2.66GHz and the memory set to the maximum 1333Mhz I was eager to press on and find out how the setup compared to both AMD’s AM3 and the i5’s bigger brother, the Core i7.
Let’s see how it got on in our suite of benchmarks…


