AeroCool X-Predator Evil


Up Close: Cable Management and Storage
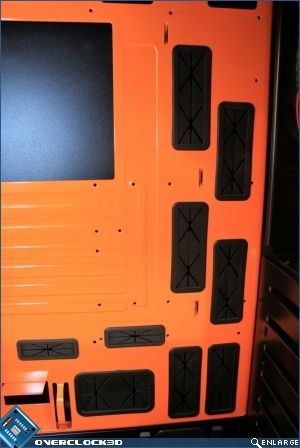
The Motherboard tray is a sturdy affair sporting a plethora of cable management holes. The holes are well spread and of a good size. It’s also nice to see the use of rubber grommets on the holes. These not only serve the obvious purpose of helping to add to the tidy look within the case, but also, being black, further continue the Orange Black theme. The Motherboard also has a good size CPU cut out, which means you don’t need to go stripping down the whole shooting match every time you want to change a cooler or upgrade your processor (How did we cope before motherboard cut outs came along)? It’s worth adding that the cut out grommets are held securely in place so you’re not going to be finding yourself having to re-attach the grommet every time you poke a cable through. This might sound like a rather insignificant detail, but believe me if you’ve ever built into a case where this happens you will know how irritating and time consuming it is.
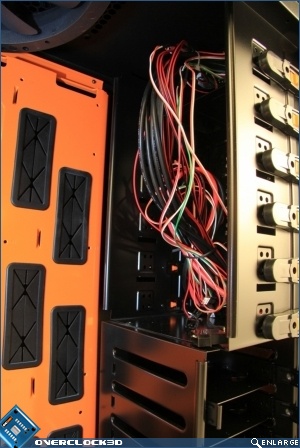
The picture above right shows the wiring loom from the front of the case. Along with the front I/O this includes the fan controller and the usual power, reset and activity light wires. Generous cable lengths are given, although of course most (and we’ll come to the annoying exception in a minute) are headed for the motherboard. So what’s the exception? What’s the big annoyance? Well as you’ve read the tech spec you’ll know this case boasts USB3 compatibility. So you’d imagine the header from the front USB3 socket goes to the USB3 Header on your new USB3 Motherboard wouldn’t you. And of course that would be a reasonable assumption, if it weren’t for the fact that this particular piece of design interface hadn’t been handed to Mr Heath and Mr Robinson. And what elegant solution did they come up with? Well they thought rather than do the obvious thing they thought it would be much better to have to trail the cable across the top of the case, exit it out the back through one of the Water-cooling tubing grommets and then double back on itself and plug into one of you precious rear I/O USB3 sockets. Not only does this rob you of a valuable rear socket, but it could put a severe crimp on any external Water-cooling solution plans. And while I’m on a rant, is it too much to ask for manufacturers to start braiding their internal case cables? Sure for the most part they’re going to be hidden, but they’ve got to emerge at some point and there’s nothing ruins a quality build quicker than the sight of ugly naked cables. I think an opportunity for some stunning colour coded Orange cables has been missed here.
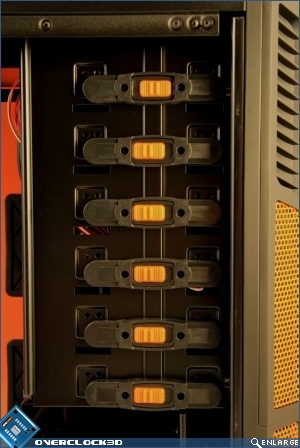
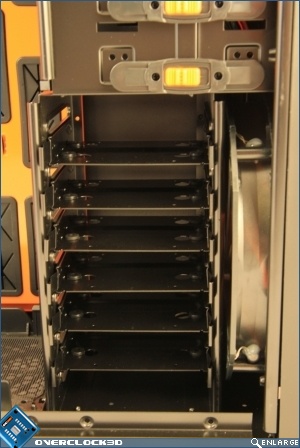
Staying on the inside of the case we now take a look at storage. In the pictures below we can see that the case provides for six external 5.25″ devices with a converter bracket included should you wish to convert one of those to allow for 3.5″ compatibility. All bays have removable dust filters. The bays of course in this day and age are of the tool-less type, with orange sliding clips providing the positive location once the device is inserted. Insertion of the drive itself however is accomplished in quite an unusual way. I’m not quite decided whether this is unusual as in innovative or unusual as in a bit unnecessary. Essentially to gain access to the drives you have to un-clip the right hand front vertical trim piece from it’s location, this then in turn gives access to the clips locating the 5.25 bays. Ok I’m going to come down on the side of innovative as it’s not an action you’re going to be doing on a regular basis, the PITA factor is minimised. Installation into the 6 internal bays is a much simpler affair, with simple slide and click tray type devices able to take not only 3.5″ HDDs but also 2.5″ HDDs and SSDs.
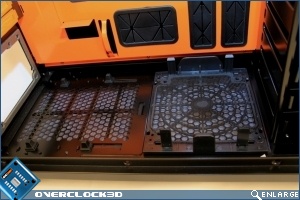
Moving to the floor of the case we find a great deal of thought has gone into this area. There’s plenty of room to accommodate a large PSU and Aerocool have clearly taken time to think about minimising the acoustic noise transferred from the PSU to the case with the inclusion of 4 rubber decoupling feet for the PSU to sit on, and also a foam rubber gasket at the rear aperture. It’s also possible to locate a fan in the base of the case with both a clip and screw mounting options for a 140mm fan and screw mounting for a 120mm fan (a fan is not included for this location). Both the intake for the PSU and the optional fan have removeable dust filters.

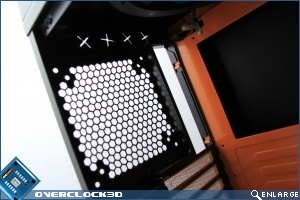
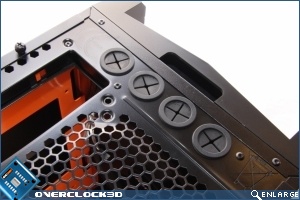
Up to the top of the case now and we find another fan location point in the position of the traditional top of case extract location. No fan is included for this mount, but it is able to accept both 120mm and 140mm fans and being an extract point there are no filters, but protection is given by means of the ubiquitous hex mesh. Also tucked away at the very top of the rear of the case are 4 holes allowing water-cooling tubing to pass through (or your USB3 cable). The holes are tidies up by means of rubber grommets and will allow anything up to 3/4″ OD tubing to pass through.