


Gamer Storm Dukase Liquid Case Review

Up Close: Interior
If by some small chance you haven’t read the home page or the introduction and just happened to pick this page at random to start reading about the Dukase, you might be thinking “What the the Hell is that” Well we’ll tell you what it is, it’s the business end of the AIO 240mm rad cooler that comes built into the Dukase Liquid case. Notice we said built into, as opposed to “bundled with”, as there is a difference. That difference is that the Dukase not only has a pump and a rad, but also has a separate reservoir which is appended to the upper right corner of the case in the area traditionally occupied by the 5.25″ bays. The only other real thing of note in this image is that although there are plentiful cable management holes, none of them are grommeted.

So here we have it, the extended AIO in all its glory. Why Extended, and not just AIO? Well because this system actually has a separate reservoir, as opposed to it being built into the pump assembly, but more of this later. As you can see, the cold plate/pump assembly comes mounted on a faux motherboard to keep it secure during transit, which is just as well, given the grief this case seems to have received on its voyage to OC3D towers.

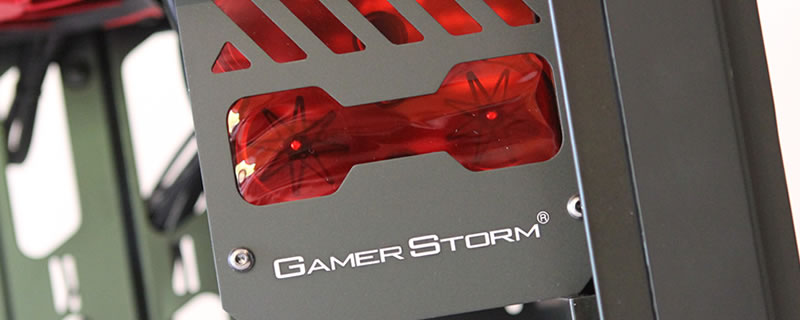
Here we can see the reservoir of the integrated AIO, which as it is illuminated by plentiful Red LEDs will be eminently visible through the large acrylic window. The res is about 20mm deep and contains a pair of non active impellers, which although not that visible on this image, can be clearly seen on the page header. These “impellers” will turn as the coolant circulates indicating movement, but don’t go thinking they are the pump. Now, we might be being a bit picky, but it’s worth noting that the thin red acrylic that covers the front case of the reservoir wasn’t perfectly flat. In all honesty, it’s barely noticeable, but we did, in fact, notice it. But then, we are OC3D.

Although no front fans are included, the case will actually take a pair of 120s or a single 140 in the front. With the reservoir above, and the false floor below, this space, is otherwise, totally wasted.

Looking down into the base of the case we can see that like a good many cases today, the Dukase favours the false floor. Towards the front there’s an area of ventilation, although we’re not exactly sure why, as the only thing underneath this area is the 3.5″ drive cage, and they’re not exactly renowned for generating bucket loads of heat. Moving towards the left we see that there’s a pair of 2.5″ drive mounts, which it has to be said have well placed although perhaps slightly over-sized cable management holes.

Peering into the rear of the case we see that there are seven expansion slots, and, as we noted when we looked at the exterior, one of the covers is missing. We did in fact find it rattling around, and thankfully it hadn’t done any damage that we could see.

For a case with a false floor, the rear of mobo area is actually quite un remarkable. There’a good sized PSU bay, and a cage which can house either a pair of 3.5″ or 2.5″ drives. There’s also a mount for a 2.5″ drive laterally above the main cage, but this isn’t immediately obvious

Worryingly, the majority of the rear of the case only has about 12mm of cable management space, which to be honest isn’t good enough. OK, so you’re going to be able to fit things in, but you’re going to have to be 100% anal about how you go about it. The frontal area of the case does have slightly more room, which we guess is an improvement, but you’re still going to be challenged to fit all those cables in.

Aside from the roof vent cover, the only other removable panel is the front door assembly. It will require a hefty tug to get it off though, and a fair few strategically placed slaps to get it back on. The front I/O remains attached to the case though, so there’s no worries with regards to ripping wires out. There’s potentially room to get a 240mm rad in the front, as there’s mounts for a a pair of 120mm fans, but to do so would require quite a bit of modding work to be done, not least of which would be the relocation of the reservoir.

I spy, with my little eye, something beginning with “T”. Give up??? It’s Thumb bolt, and in particular the missing thumb bolt that should have been securing the wayward PCI slot cover. Don’t worry, it’s not glued in place, it is though held securely by one of the magnets responsible for holding the door shut. The Elephant in the room here though is the quality of the hot glue gun job that’s been done, or rather lack of quality. OK, so this area won’t be seen, but it’s crappy work such as this that gives insight into the quality of the rest of the case, and if this is anything to go by things aren’t looking good. If the snail trail of glue meandering around the whole of the rear of the front panel doesn’t bother you…Well it should!
