


Noctua NH-C12P CPU Cooler

Test Setup
For the testing of the Noctua NH-C12P the following test setup was used:
The room temperature throughout testing remained at 10 degrees Celsius, all of the testing was done on a test bed with no additional airflow being directed at the heatsink. The room temperature was measured approximately 6 inches in front of the pull side of the fan.
For thermal interface paste, the provided NT-H1 was used. This thermal paste does not require a burn in time or numerous cycles to reach maximum effectiveness but nonetheless was given several cycles of 30 minutes to ensure good distribution of the paste. The paste was cleaned off fully after each cooler and replaced. To log CPU temperatures, the latest release of Abit uGuru was used. Usually we would opt for an application such as CoreTemp for this task but due to compatibility issues with the CPU used, another program needed to be used. uGuru was found to be most accurate with the use of a temperature probe. For the duration of the testing the fan was connected to a 12v molex with a 3pin adapter, voltages on the same rail were monitored via multimeter to ensure the fan was receiving full power at all times.
The CPU was tested at idle and at load for both stock speeds and voltage (200 x 9 (1.8 GHz) @ 1.325v), then tested with an overclock of 325 x 9 ( 2.93 GHz) @ 1.505v to gain a good idea of the capability of the cooler. For idle temperatures the computer was left with just uGuru running for 30 minutes then 5 measurements taken at 5-minute intervals to provide an average. For the load temperatures I ran an instance of Prime95 with in-place large FFT’s for maximum heat and power consumption, as well as an instance of [email protected] set to take up any spare cycles of the CPU. The same measurement system was used for taking the load results.
For comparison we will be using the stock Intel LGA775 cooler and a NH-U12P, kindly supplied for testing by Specialtech. In previous testing the NH-U12P surpassed the performance of several widely used HSF coolers. Therefore if the NH-C12P succeeds in undercutting the NH-U12P temperatures we can draw a fairly finite conclusion.
Installation
The NH-C12P is packaged with both an LGA775 mounting system and an AMD AM2 mounting system. For this review we will only be able to test the 775 mounting system.

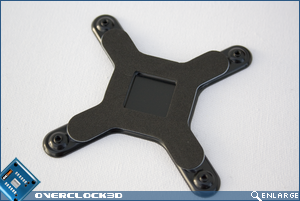
As you can see the backplate is nicely made and well padded / insulated. Unlike the previous Noctua heatsink backplate, there is no adhesive applied to the foam. The parts which constitute the mounting system are equally well formed and should fit together without any hassle. The AM2 mounting system is much of the same.

The installation process itself is fairly simple and with the use of the fantastic installation manual should provide no stress for the user. To fit the cooler, first you must fit two bolt on plates to the base of the heatsink, extending the width outwards.


Once the two plates are attached, the LGA775 backplate is placed behind the socket and the two feet screwed through into it.

Then it is a simple case of placing the cooler on the feet and using the two screw down springs provided to add pressure. As you can see the IN9 32X motherboard has a particularly large NB heatsink. This, coupled with the large heatsinks on the XMS2 DHX ram modules used, limited the fitting of the cooler to one position.. Were they both of average size I am fairly certain there would be no restrictions to mounting direction whatsoever. Not that it will make much difference.

Once the cooler is in place and secured properly the user can fit the sticky backed vibration dampers (seen above) and clip on the fan using the sprung steel bars provided. The NH-C12P will take one 120mm fan, whereas the NH-U12P will in fact take two in a push / pull configuration. Hopefully the slightly higher fin distribution density seen on the NH-C12P will keep the cooler on par with just the one fan.

Overall the installation was without any significant difficulty and provided a perfectly stable mounting. When the cooler was later removed, the distribution of the thermal paste indicated a good level of even pressure. On the downside however, the installation does require the removal of the motherboard. While this is not a problem for a lot of people, those with more cramped cases and fastidious cable tidying may find it a huge inconvenience.