


Steam Deck SSD Upgrade Guide – Building a 1TB Steam Deck


Step One – Grab your Steam Deck’s carrying case
To install a new SSD inside if you Steam Deck, you will need to take the system apart, at least partially. To do this, we recommend grabbing your Steam Deck case and setting your Steam Deck down on it as shown below. This will allow you to work on your Steam Deck on a flat surface without placing unnecessary pressure on the system’s analog sticks and give the system a stable place to rest.
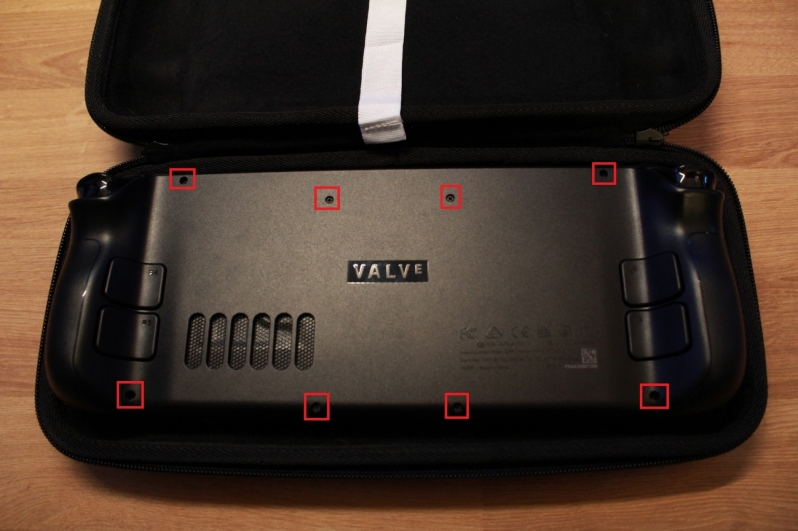
Before trying to open your Steam Deck, please make sure that any MicroSD cards that are connected to the system are removed and that nothing is plugged into the system’s USB Type-C port. From there, you can safely remove the back of the Steam Deck by removing the eight screws shown above.
The four central screws below are shorter than the four screws towards the outside of the system. Please place these screws in a safe place after their removal, such as a magnetic sorting tray (like shown below).

Once these screws are removed, you can remove the back of your Steam Deck using a plastic electronics opening pick This will allow Steam Deck users to remove the rear casing of the unit without damaging it. After the Steam Deck’s rear panel is removed, place it in a safe place.

After removing the Steam Deck’s rear casing, you will need to remove the metallic heat-shield shown below. However, one screw on this heat shield is covered using a thin metallic tape. You will need to partially remove this tape, like shown below, using your tweezers. Do not fully remove his metallic tape, as this will make it easier to re-apply later.

Once you have exposed the Steam Deck’s hidden screw, you can then remove the heat shield by removing the screws shown below. This will expose the Steam Deck’s SOC, memory chips, and SSD slot. When removing the Steam Deck’s heat shield, make sure that you do not remove the thermal pads that are pre-installed on this plate, and that these thermal pads do not get dirty while the plate is not in place.

Once the Steam Deck’s heat shield is remove, your Steam Deck will look like the image below. While the Steam Deck’s SSD is now exposed, we do not recommend removing the system’s SSD yet.

Before removing your Steam Deck’s SSD, you should disconnect the Steam Deck’s primary motherboard from the system’s battery. You can do this with your tweezers, carefully.

Once your Steam Deck’s battery is disconnected, you can now safely remove the screw shown below to make the Steam Deck’s stock SSD removable.

Once you remove the Steam Deck’s SSD screw, the SSD should now rise up as shown below. From here, you can simply remove the SSD.

Since Valve installed the stock SSD with an EMI shield, we feel that it is appropriate to remove this EMI shield and install it on our Western Digital SN740. This can be done by hand.

When you add the EMI shield to your Steam Deck’s new SSD, it should look like the image below.

Now you can install your new SSD inside your Steam Deck, placing it in the system’s M.2 slot at a 40-ish degree angle as shown below. From here, you can simply follow our disassembly instructions in reverse to put your Steam Deck back together.

If you turn on your Steam Deck with your new SSD, you will be greeted with the following message. This is because your SSD lacks a copy of Steam Deck OS, which means that you now need to re-image Steam OS onto your Deck. We will explain how to do this on the next page.
