


Steam Deck SSD Upgrade Guide – Building a 1TB Steam Deck


Download Valve’s SteamOS Steam Deck Image
To install Steam Deck OS onto your newly upgraded Steam Deck, you will need to download Valve’s Steam Deck Image here. This image is around 3GB in size.
Start Charging your Steam Deck
If you have followed our instructions, you will have installed your SSD on a Steam Deck with a battery with less than 25% charge. This makes now a great time to charge your Steam Deck, as this will prevent your Deck from potentially running out of charge when your are installing SteamOS.
Alternatively, you can use a Steam Deck dock or USB Type-C hub to install your Steam Deck image and charge the device simultaneously.

Write the image to a USB Drive
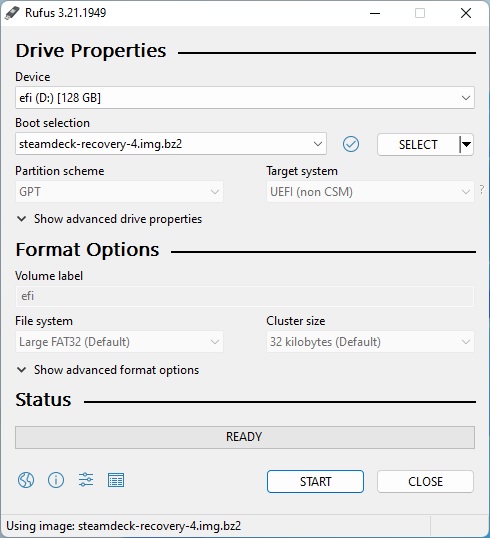
Next up you will need to write Steam Deck’s OS image to a USB drive. This should be a USB Type-C drive (or a Type-A drive with a Type-C Adapter) that is 8GB in size or larger.
To place Valve’s Steam Deck OS image onto our USB drive, we used a program called Rufus, which can be downloaded here. Alternatively, users of MacOS or Linux can use Balena Etcher, which can be downloaded here.
Insert the USB Stick into your Steam Deck
After charging your Steam Deck, you should make sure the unit is turned off and then insert your bootable USB memory stick.

Next, you should turn on your Steam Deck by holding the power button and the volume + button simultaneously. When the Steam Deck chimes, you can let go of both buttons. This should boot your Steam Deck into the screen below.

Next you should enter the Steam Deck’s boot manager and then boot the system using your EFI USB device. After this step, your Steam Deck will then boot into the SteamOS Desktop recovery environment. You can now re-image your Steam Deck using the “Re-image Steam Deck” shortcut.
Doing this will install the default factory version of SteamOS onto your Steam Deck’s SSD.

Once you clock the “Re-Image Steam Deck” shortcut, you will be given the following prompt. Hit “Proceed” and wait a few minutes for your Steam Deck’s OS image to install.

After this is done click proceed to reboot the Steam Deck using your new SSD.

Steam Deck OS is now installed and is in its factory state. Please set up your Steam Deck as you did when you first purchased the unit.

Well done, now you have re-imaged SteamOS onto your new SSD. You can now use your Steam Deck as normal, but with a larger, faster SSD.
